December 23, 2008

Christmas Decoration Idea (5)


Today, I will explain you how to make these candle holders. Great to make together with kids, so perfect for the holidays.

All you need is:
* Some clean glass jars/pots (from babyfood, jam, desserts)
* Thin iron wire that can be easily formed by hand
* Stickers, glass paint, ribbon, glitters, glue etc....
* Little candles (waxine lichtjes in Dutch)

Embellish the jars with the stickers, ribbon, glitters, paint etc. of your choice.

Let them dry for a while before attaching the iron wire to it (or attach the wire first).
Make a loop from the wire and put this around the neck of the jar, twist it to fasten it around the jar. You can now make a loop from the remaining piece of iron wire if you bend the wire and attach the end piece to the other side of the jar.
Done! Ready to light the candles and sparkle up your christmas!
These candle holders are also great as a garden decoration.

December 19, 2008

Christmas Decoration Idea (4)

Feeling a lot better after a good night sleep, time for a new decoration idea.
For today an idea to decorate yourself with: a felt flower brooch. You can also make this flower with cotton fabrics, but I think a felt one is more wintery in a way.
Sorry for the bad pictures, it is quite difficult to make good pictures with the dark weather.

You need for the brooch:
Felt
Flower template (you can find it here)
Scissors
Needle
Coordinating thread
Brooch pin

What to do:
First print out the template and cut out the 3 largest flowers.
Trace the largest flower 3 times on your felt, the medium and the small ones both 2 times.

Cut out all the flowers.
Start your flower with laying a large flower flat. Fold another large flower double and place it on the flat one, sew these together.

Now, fold the third large flower 2 times double and place it on the others, sew them together.

Continue with the medium flowers in the same way and end with the smallest (while you are busy with the flower, you will see what is the best way to place your leafs).

When your flower is done, you can now attach it to the brooch pin.

You can also sew the flower on a piece of ribbon to make a napkin holder from it.

December 18, 2008

Sorry....

No Christmas Decoration Idea today...
I had a very busy day with a christmas dinner and market at Teun's school and I am off to bed now (feeling a bit flu-ish and cold).
To keep you busy in the meantime, try this. Haha, an absolute time waster! You can play christmas songs on your computer keyboard. I found it on the Dutch weblog Do Something Pretty, absolutely worth a visit too.

December 17, 2008

Christmas Decoration Idea (3)

This idea is not really for decoration, but it is a great way to use your fabric scraps for (which I always save, just in case.... you know....).

These scraps are just perfect to make your (christmas) gift labels with!
You will need:
- Cardboard gift labels
- Fabric scraps
- Ruler
- Fabric marker or chalk
- Pinking shears
- Glue

First, you measure how large your piece of fabric should be (depending on the size of your label). I left a 0,5 cm piece of cardboard free on the sides and on the bottom of the label and 2 cm from the hole to the upper piece of the fabric (I hope that this is clear....).
Trace this size on a piece of fabric and cut this out with the pinking shears.

Glue your piece of fabric on your label and it's ready to go with a present.

Also good with other fabrics of course.

December 16, 2008

Christmas Decoration Idea (2)


Today, I will show you how to make a fabric house ornament.
Great to make as a last-minute gift or to hang in your christmas tree.
This house is also perfect for other occasions, if you use different fabrics and embellishments.

What do you need?

- The house template (download it here, it includes 0,75 cm seam allowance).
- Felt (cutted with pinking shears), a piece of 3 x 4 cm for the door, a piece of 2,5 x 3 cm for the window.
- Fabric for the house, 2 pieces of ± 11 x 16 cm (can be the same or contrasting fabric).
- 1 button with diameter of ± 1 cm.
- Ribbon or cord (± 15 cm) for the hanging loop.
- Stuffing material.
- Needle, thread, siccors.
- Sewing machine.
- Embroidery thread, ribbon, beads, felt stars, trees etc. to embellish your house with.

What do you do?

1. Cut out the template and trace this onto your two pieces of fabric.
2. Cut out the two pieces of fabric.

3. Sew the door and window onto the front piece of your house (see template for position).
4. Hand-sew the button on the door. Embellish your house with the decoration of your choice (remember to not to embellish on the seam allowance of 0,75 cm, you won’t see it once your house is finished).

5. Pin the ribbon/cord loop (loop pointing inside) to the top of the roof.

6. Pin the two fabric pieces together, right side in.
7. Sew along the sides, leaving a 2 cm hole for turning.

8. Turn you house right side out.
9. Stuff you house to the desired thickness.

10. Top stitch around the whole house (to close the opening as well).
11. Ready is your house!

Have fun!

December 15, 2008

Christmas Decoration Idea (1)


I am trying to post a Christmas Decoration Idea each day of this week and I am starting of with this (very easy to make) christmas garland.
All you need is a piece of red felt, a piece of red and white bakers twine (available here) and siccors.
You can find the template for the stars here. On this website you can find many more great templates, ideas and decorations for different occasions by the way.
I used the medium star, traced it on a piece of cardbord and cutted it out. In this way you have a easy to use and reuseable template to trace the figure on your felt.
Now you can cut the stars out of the felt. To attach the stars to the twine, you need to make two small incisions in the top of each star (see picture).

All you have to do now is thread the bakers twine through the stars and ready is your garland.
To make your garland more colourful you can also use various colours of felt.
To make your garland more festive, you (or your kids!) can decorate the stars with sparkle/glitter glue.

Christmas Swap


I found this sweet package in my mail last Friday.
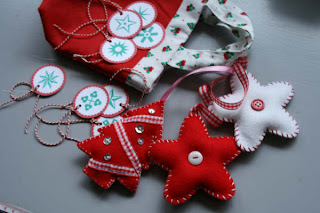
I did a christmas swap with Petra from byPetra and she sent me this christmas bag filled with little gift labels and cute christmas ornaments.

December 12, 2008

Bye Sinterklaas, let's start decorating for christmas!


We were all very spoilt last weekend by sinterklaas (especially the kids, of course).
Teun still sings the "sinterklaas" songs, because he likes them so much.
And now on to christmas.....
Plans for the weekend: buying a tree, decorating the house, find back the lights to hang in the playhouse in the garden, make some handmade christmas gifts for the family.
Have fun this weekend!

December 2, 2008

Little impression


Here are a few pictures of the christmas fair.
It was really nice being there and selling my handmade stuff to enthousiastic people who where really surpised that everything was handmade!

Also, the fabrics sold really well.

November 27, 2008

Sneak peek (2)


Tomorrow (actually Today), the Christmas Fair starts until Sunday.
I am quite excited!
I made a bunch of new Good Luck Dolls for it.
So, wish me good luck (!) and see you after the weekend.

November 19, 2008

Sneak peek (1)

These are a few of the things that I have been working on in the past few weeks:

Guessed what they are? Yeah, fabric christmas trees.
I am preparing for a big Christmas Fair next week (Kerstcreaties) and I am trying to make as much as I can to show and hopefully sell! together with my fabrics over there.
Some more sneak peeks to come the next few days.

November 17, 2008

In for a swap?


I received this MarieClaire idees magazine as a present, but I have a subsciption to it as well, so now I have two of them. It is the winter edition with lots of ideas for winter and christmas crafts.
Would anyone like to swap this for something else wintery (magazine, fabric, christmas decoration etc....)?
If you are interested, please leave me a message or send me an e-mail.
Update 19/11: I found a swap partner, thanks!

November 7, 2008

Work in progress

Lots of work to do lately, so not much time for blogging, sorry. I still did not find the time to finish the marble bag tutorial, but I promise, it will come soon!
I had some custom orders and what I did was making this baby play mat:


And this baby play mat:


And these bags (aha and another marble bag):


All made with some cute fabrics that you can find in my shop as well.
By the way, if you buy products for 15 euros or more from my shop in November, you will get a 10% discount.

October 28, 2008

Vote for me!! (please....??)

Or design a fabric and have a go yourself of course.
I have entered this fabric design into a competition, so please go and vote for me:

The website is called Bon Bon Kakku and is a pioneering net store where you can design your own fabrics. If your design is a success, it will be also sold on the site. Every fabric designed on the site will be published on the site for viewers to see and vote for. They will choose the fabrics to sell on their store based on the results of viewers voting.
I promise that if I win, I will give away a piece of the fabric to one of you!

October 27, 2008

Photo fun

I found this website already a while ago: picnik.
You can upload and change your picture into many other styles/colours etc.
For example this picture:

Can be changed into this:

or this:

or this:

or this:

and this:

and if you are already in the winter mood even into this:

October 20, 2008

Little monsters

Via Swap-bot, I signed in for a monster swap.
I received this cute little pink monster from the US:

And this one is ready to fly over the ocean to the US:

The concept of Swap-Bot is very nice. There are all different kinds of swaps (fabrics, postcards, souvenirs etc.) to choose from or you can set-up one yourself. You end up in a pool and a random swap partner is assigned. So, always a surprise who to send your swap to.

October 13, 2008

Hieperdepiep hoera!


Teun is 4 years old now. Today is his birthday, but we celebrated it yesterday with friends and family and lots of presents. And cakes of course! I baked a walnut cake and a "birthday" cake. Teun proudly decorated both the cakes with little candy toadstools himself. Sweet little big boy!

October 10, 2008

I am free!!!


Yes! The cask came of this week. It still feels a bit strange and my arm is quite stiff, but hey, I can do things again!! My first project was to make some marble bags for Teun his birthdayparty at the child day care centre. Doing that wasn't too bad. So sewing machine....... Here I come! I tried to make pictures for a "how to make a marblebag tutorial" and this will follow next week. Wow, plenty of plans coming up, I will be busy. Have a good weekend!

October 6, 2008

A little bit more of Sweden - Malmo

We did not only visit the apple party when we were in Sweden, but we were also lucky to spend a few more days over there. We decided to go to Malmo.

I really wanted to visit the Form/Design center, because I love Scandinavian design and I saw on their website that they have lots of fabrics. Unfortunately they don't sell the fabrics, they only show samples. The Form/Design center is situated in the nicest and most pittoresque part of Malmo, surrounded by some nice boutiques and a square with restaurants and cafes.


The rest of Malmo is quite modern and there are quite a bunch of retail stores that you can find in most of the big cities.
A bit outside of the city centre, we went to see the Turning Torso. The highest tower of Sweden, it makes a twist and overlooks the sea and the Oresund bride to Denmark (Copenhagen).